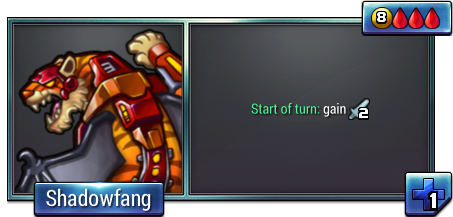
A Shadowfang
Shadowfang is a Red backline attacker. Shadowfang is a purely offensive unit, and is one of the most efficient attackers in the game. It is notable for requiring ![]()
![]()
![]() , meaning it cannot be built from a single Animus.
, meaning it cannot be built from a single Animus.
Panel[ | ]
Strategy[ | ]
Compared to 2 Tarsiers, Shadowfang costs 1![]() more, but has 1 less turn of
more, but has 1 less turn of ![]() buildtime, meaning it essentially deals
buildtime, meaning it essentially deals ![]()
![]() more for the 1st turn, in exchange for only
more for the 1st turn, in exchange for only ![]() - clearly a bargain. Shadowfang is therefore one of the most raw-efficient attackers in the game. However, it suffers from an extremely unfortunate tech cost. Costing a lot of
- clearly a bargain. Shadowfang is therefore one of the most raw-efficient attackers in the game. However, it suffers from an extremely unfortunate tech cost. Costing a lot of ![]() is bad for a unit in general because it means you will likely waste that red in the late game or else spend it on inefficient defenders like Rhinos. Additionally,
is bad for a unit in general because it means you will likely waste that red in the late game or else spend it on inefficient defenders like Rhinos. Additionally, ![]()
![]()
![]() is an odd amount because it usually requires you to get two Animuses but then leaves you with one red leftover. Spending the fourth red is often difficult outside of high-economy games. It may still be worth getting at that cost, though.
is an odd amount because it usually requires you to get two Animuses but then leaves you with one red leftover. Spending the fourth red is often difficult outside of high-economy games. It may still be worth getting at that cost, though.
Thus, although it might be tempting, rushing Shadowfangs on a low economy is almost always a bad idea unless there is serious support in the set, as counter aggression can force you to switch to Rhinos for defense and you will likely find yourself horribly overteched when you can no longer buy Shadowfangs - not to mention cut off from good absorb. Shadowfangs are better suited to mid- and high-economy games, where you will be able to produce them for long enough that their efficiency will pay off for the cost of wasting so much ![]() in the late-game.
in the late-game.
Shadowfang is not viable on its own (that is, in base + Shadowfang correct play does not involve getting it). Generally speaking it needs either a good combo (see below) or a big absorber like Energy Matrix or Xaetron to be viable, preferably both.
Since Shadowfang's strength is in being extremely raw-efficient and its weakness is in being vulnerable on defense, it can be a counter to slow, defensive strategies like Savior or Zemora Voidbringer, because you know you won't be attacked for a good while, so you can get several Shadowfangs out before you have to start defending and wasting red.
Combos[ | ]
Certain units can eliminate the drawback of Shadowfang's awkward tech cost. Flame Animus, Mobile Animus and Chrono Filter allow you to get to exactly 3 red, while Blood Phage allows you to turn the 4th red into gold if you can't spend it, Ossified Drone allows you to convert it to defense and Perforator allows you to convert it to damage. Red sink units in general (Nitrocybe, Husk) also help, as does Blood Pact. Blood Pact is normally a very inefficient defender, but if it means you can squeeze one more Shadowfang, it's quite good.
Ebb Turbine (and to a lesser extent Auride Core) is another friend of Shadowfang. Clicking these units can give you the gold you need to squeeze out one or two more Shadowfangs before you have to start spending all resources on defense, and since Shadowfang itself is so raw-efficient, this is almost always an excellent trade.
Openings[ | ]
Player 2 Shadowfang Rush:
Player 1 may try to go faster to undercut it. (Turn 2: D + Mobile Animus), thus getting 2 Shadowfang before expending it and taking damage, gaining a lead of ![]()
![]() on attack. This is bound to lose to Player 2 adding 1 extra attack though, thus, Player 2 dominates the line. More efficient econ such as Vivid Drone improve the defense capacity of said out-rush, enabling it to play effectively in such a case.
on attack. This is bound to lose to Player 2 adding 1 extra attack though, thus, Player 2 dominates the line. More efficient econ such as Vivid Drone improve the defense capacity of said out-rush, enabling it to play effectively in such a case.
Turn 2 A instead of DD is not advised, it's rough, but it leaves little room to defend. A red combo such as Perforator enables it though.
Player 1 Chrono Filter
Player 2 Chrono Filter
- DD
- DA
- TDD
- TT + Chrono Filter
- Shadowfang + W
Player 2 slow Chrono Filter
- DD
- DD + Chrono Filter
- ST
- DDA
- Shadowfang + W
- TTD
- Shadowfang + WD
Player 2 Mobile Animus + Galvani Drone (1).
The fastest rush timing, can switch out. Player 1 should mirror.
Player 1 Mobile Animus + Galvani Drone (1).
- D1
- Mobile Animus +A
- Shadowfang
- Shadowfang
The earliest rush timing, may switch out with a constant sink.
Player 1 Ossified Drone (1)
- DD
- A
- TD1
- TA click 1
- Shadowfang
Gains some Defense for a few turns. Player 2 may mirror.
Player 2 Flame Animus (1)
- DD
- DB
- DD1
- DDA or SA (Waste B)
- Shadowfang +W (2 left)
Gains attack and econ while defending.
Player 1 with Flame Animus (1) and Vivid Drone (0)
- B
- 01
- 01
- 01
- TW
- Shadowfang
Quick rush without too bad of a commitment.
Player 2 with Vivid Drone (1) and Perforator (2) rush
- A
- 122
- A1
- Shadowfang
Starts with a tough Defense.
Player 2 Doomed Drone (1) line:
- DE1
- DDD
- A111
- TTA
- Shadowfang +R1
Does not require heavy support.
Player 1 Auric Impulse (1):
- DD
- 11
- AA11
- Shadowfang +T1
- Shadowfang +R
(8RRRR Econ left) If the opponent did not set pressure. Needs either Perforator or Ossified Drone to work.
Player 2 Auric Impulse (1) rush:
- D1
- A11
- TTA1
- Shadowfang +T
- Shadowfang
(8RRRR Econ left) Follow through if the opponent did not set Tech for pressure. Requires some cheap Red sinks as well.
Player 2 Auric Impulse (1) and Ossified Drone (2) rush:
- 11
- AA1
- Shadowfang +2 (2 left)
- Shadowfang +click 2
- Shadowfang +click 2
Deadly if the opponent did not set hard pressure. Benefits greatly from the smaller Drones.
Player 1 Blood Phage (1) and Ossified Drone (2) rush.
- A
- T2
- 1 click 2
- A click 2
- Shadowfang click 1
Can withstand some attack.
Player 1 Blood Phage (1)
- DD
- A
- T1
- TT
- TA
- Shadowfang +E
If enemy player lacks pressure.
Player 1 Blood Phage (1) early Animus
- A
- 1
- A
- Shadowfang
- Shadowfang
Wastes 3 Red once. Requires effective, cheap Red defense/sink.
Player 2 Blood Phage (1) and Ossified Drone (2) rush.
- A
- 12
- 1 click 2 (Rush with A)
- DA click 12
- Shadowfang +D click 1
Can withstand a fairly firm attack.
Player 1 Ferritin Sac (1) and Blood Phage (2) rush.
- DD
- A
- D12
- DA (or A11, etc)
- Shadowfang +W
Offers a Wall and constant Attack ramp with excedent for defense.
Player 2 Ferritin Sac (1) and Blood Phage (2) rush.
- DD
- DA
- D12
- AR1
- Shadowfang +W
- Shadowfang +WE
Comes after the Player 1 rush, but gets a much better position.
Early pressure version:
- DD
- A
- A12
- Shadowfang
- Shadowfang +W
Less efficient but better Attack.
Player 2 high econ. Doomed Drone (1).
- DE1
- DDD
- DDEE1
- DDDDD
- DDDDA1
- TTAA11
- x2 Shadowfang +11111
For an otherwise defensive set. Requires support for constant Tech sink.
Player 1 high econ. Doomed Drone (1).
- DD
- DDE
- DDE1
- DDDD
- AA111
- Shadowfang +TA1
- x2 Shadowfang +11
For an otherwise defensive set. Requires a constant Tech sink.
Player 1 high econ. Doomed Drone (1), Blood Phage (2).
- DD
- DDE
- DDD
- DDA1
- D22
- TAA1
- 2x Shadowfang (4 left)
For an otherwise defensive set.
Player 1 faster Rush:
- DD
- DD
- DDA
- 22
- AT1
- Shadowfang +A1
- x2 Shadowfang
Player 2 Trinity Drone (1) and Feral Warden (2) line:
- DD
- DDC
- DA1
- TTA
- Shadowfang +2
Needs something to sink Red excess as needed.
Player 1 Thorium Dynamo (1) and Feral Warden (2)
- DD
- D1
- DD
- DCA
- TTAD
- Shadowfang +F2
Player 1 Centrifuge and Energy Matrix:
- DD
- DDE
- DDD
- DDD Centrifuge
- DDDA
- TTDDA
- 2x Shadowfang +Energy Matrix
Change Log[ | ]
External Links[ | ]
- Why We Nerfed Shadowfang, a video by Elyot Grant and Will Ma. (September 23rd, 2014)
| Unit types |
|---|

