This guide will teach you the standard style of play - a style of play that is simple enough for a beginner to be able to learn, while still being grounded in real high level Prismata strategy. In many high level games, players closely follow the guidelines outlined here, albeit with much more nuance.
Buy, Buy, Buy[ | ]
Buy as much as you can each turn. It's especially important to spend your Red and Blue, since they disappear at the end of your turn, but aim to spend your Gold and Green too. As a rule of thumb, having one or two Gold or Green left over at the end of your turn is fine, but try to avoid floating three or more.
As for what to buy, Drones are good early on, and attackers are good later on. Both Drones and attackers have a good return on investment (ROI) because they both have a concrete and useful effect each turn - Drones give you a Gold, while attackers deal damage to your opponent. Because their effect happens each turn, the sooner you can buy them, the better. If you manage to make a Drone one turn earlier, that's one extra gold you just earned, and if you get an attacker out one turn earlier, that's one more damage that your opponent takes. Prismata is a game of exponential growth, and in games of exponential growth this type of advantage snowballs quickly. So, you should aim to get Drones and attackers out as quickly as you can - hence the advice about buying as much of them as you can each turn.
So, if they're both good to get early, why focus on Drones first and attackers later? Attackers are not good if you make them too early, because they can get absorbed. Buying an early attacker that gets absorbed is still better than doing nothing with your resources, but it's not as good as buying Drones. More on this in section 4.
What about buying tech buildings - Conduits, Blastforges, and Animuses? Making some tech buildings is necessary for making attack and defense, but still, buy them sparingly. It's a common beginner mistake to get too many tech buildings and end up with more green, blue, or red than you can actually spend, which leads to wasting resources. More on this in section 6.
Live on the Edge[ | ]
Build only the bare minimum defense needed each turn. By putting off defense until later, you can get your high-ROI Drones and attackers out faster.
As we covered in the previous section, there's a clear benefit to making Drones and attackers earlier. However, there's no advantage to buying defense early. Look at a unit like Wall or Forcefield - it doesn't do anything except block. So, if it's not blocking at the start of your next turn, it's not doing anything useful. So, you want to put off buying defense as long as you can.
But just how long can you put off making defense for? If you cut it too close, won't you get taken by surprise, get breached, and lose? Surprisingly, no. Most defense in Prismata is Prompt, and since the game displays the maximum damage your opponent can do next turn, so as long as you buy enough Prompt defense to make that breach warning sign go away, you're fine. Once you've done that, put the rest of your resources into Drones or attackers. This might feel scary at first, but it's actually quite safe, and the benefits are worth the risk.
If we're supposed to put off defense until the last minute, does that mean that non-prompt blockers, like Chieftain or Hannibull, are bad? In order to compensate for the disadvantage of being slow to build, non-prompt blockers have a higher health to cost ratio than Prompt blockers - compare Wall to Infusion Grid. Because of this, defending with non-prompt blockers is fine, but can take a bit more planning than defending with prompt blockers. You still want your non-prompt blockers to be useful as soon as they finish building, so make sure you don't make too much non-prompt defense and end up with more defense than you actually need.
There is one exception to the rule of putting off defense until the last minute. In this section, we've been talking about defense that doesn't do anything except die on defense. This defense is called soak. Most defense is soak, and whether it's prompt or non-prompt, you still want to put off building it as long as possible. However, not all your blockers have to die on defense - if you put damage on a blocker that isn't enough to kill it, it instantly regenerates (as long as it isn't Fragile). This is called absorbing damage, and is the subject of the next section.
Absorb is Awesome[ | ]
Absorbing damage is really good, so go for the biggest blocker in the set and absorb on it.
To see how strong absorb is, let's compare absorb to attack. Making two Steelsplitters costs 12BB, and does two damage per turn. A Wall can absorb two damage per turn, and costs 5B. So, in this case, absorb is over twice as efficient as attack. This leads to the question, doesn't that mean that absorb is broken, and should be nerfed? It is broken, but it shouldn't be nerfed. It's Prismata's version of Defender's Advantage.
Defender's Advantage is put in games in order to make the decision between investing in economy and making attackers interesting. In RTS games like Starcraft, the primary defender's advantage is the distance that the attacker has to travel to get to their opponent's base. If players started right next to each other, the game would be much less interesting. In Prismata, the defender's advantage is absorb. The game is balanced around the assumption that both players are going to try to absorb as much as possible - if you don't, you will find yourself losing to people who do, even if you outplay them in other areas.
The simplest way to absorb more damage is to get a big blocker that can absorb a lot. A 3-health unit can only absorb a maximum of 2 damage, while a 6-health blocker can absorb up to 5 damage. So, go for the biggest blocker that you can in each set, and absorb on that each turn.
There are some exceptions to this rule - for example, Redeemer is better to attack with than to absorb on, and Energy Matrix is a better absorber than Omega Splitter even though Omega Splitter has more health. Still, it's a good starting point.
Changing Gears[ | ]
First make Drones, then switch to making attackers. In the early game, Drones are better, because any attack you make early on will just get absorbed. During this phase, you should be buying as many Drones as you can per turn - this means building two per turn if you decide to stay on two Engineers, and three per turn if you decide to build a 3rd Engineer.
Why make attackers at all? Attackers that deal damage are stronger than Drones. So although the first attackers you make will get absorbed, all of the attackers you make after that are guaranteed to deal damage because your opponent will already be absorbing at the maximum. So, once you've overcome the absorb barrier (doing more damage than they can absorb), you should be focused on making as many attackers as you can. If you have 3 Gold left over, it's alright to make a Drone, but the ideal is for all of your spare resources to go into making attackers once you're over the absorb barrier.
The switch from making Drones to making attackers is fast, but not instantaneous. There will usually be a few turns of transition, where you are still making some Drones, adding on tech buildings you'll need, making a few attackers, and, if your opponent has some attack out, making an absorber.
How Many Drones Do I want?[ | ]
Absorb is what's holding you back from making attackers, so the bigger the absorb barrier is, the more economy you need before you should switch to making attack. In the base set, the absorb barrier is 2. This is a pretty small amount, so you should make the switch from Drones to attackers pretty early, at around 12-15 Drones. If the biggest blocker has 5 health, the absorb barrier is 4. You want more like 20 Drones in this case. So, at the start of the game, find the biggest blocker in the set, and use that to decide how much economy you want.
This also helps you decide what build to go for. If you want 16 or less Drones, you should stay on two Engineers, while if you want more than that, you should go up to three.
Setting Up Your Tech[ | ]
Now that you know how much income you want, it's time to decide what tech you want. You don't want more tech coming in than you can spend, and this is a common and easy mistake to make. So, we'll have to be careful we don't get too much. A good rule of thumb is that one Conduit requires 3 Gold per turn to spend, one Blastforge requires 5 Gold per turn to spend, and one Animus requires 8 Gold per turn to spend. This rule of thumb can help us avoid overteching, but doesn't tell us which tech buildings to get.
Start with the one thing you know you're going to be getting - the biggest absorber - and think about the tech you'll need to get that unit. If the biggest absorber is an extremely tech-heavy unit like Centurion, this will account for pretty much all of your tech - you need at least one Conduit, two Blastforges, and one Animus to make a Centurion. Using the guideline above, this will require 21 Gold per turn to spend, so if our plan is to go for 25 Drones in a Centurion set we only have room for maybe one more Conduit, or we can leave ourselves with some extra Gold income to make Engineers with.
On the other hand, if the biggest absorber is very cheap on tech - say, Doomed Wall - then you'll have quite a lot of flexibility in the tech you get. With Doomed Wall as your absorber, you'll want around 16 Drones, and you'll need one Blastforge to get the Doomed Wall. This means you have around 11 Gold income that still needs tech buildings to be spent efficiently. With the Blastforge, you're already set for defense, so the extra tech you make should be good for making attackers. Look at the random set and find some attackers that you think are good, and make the tech building(s) required for them.
In a Real Game[ | ]
Here is an example of the principles talked about in this guide being used in a high level game. Notice that both players are playing in the standard style, even though they have chosen to go for diverging strategies.
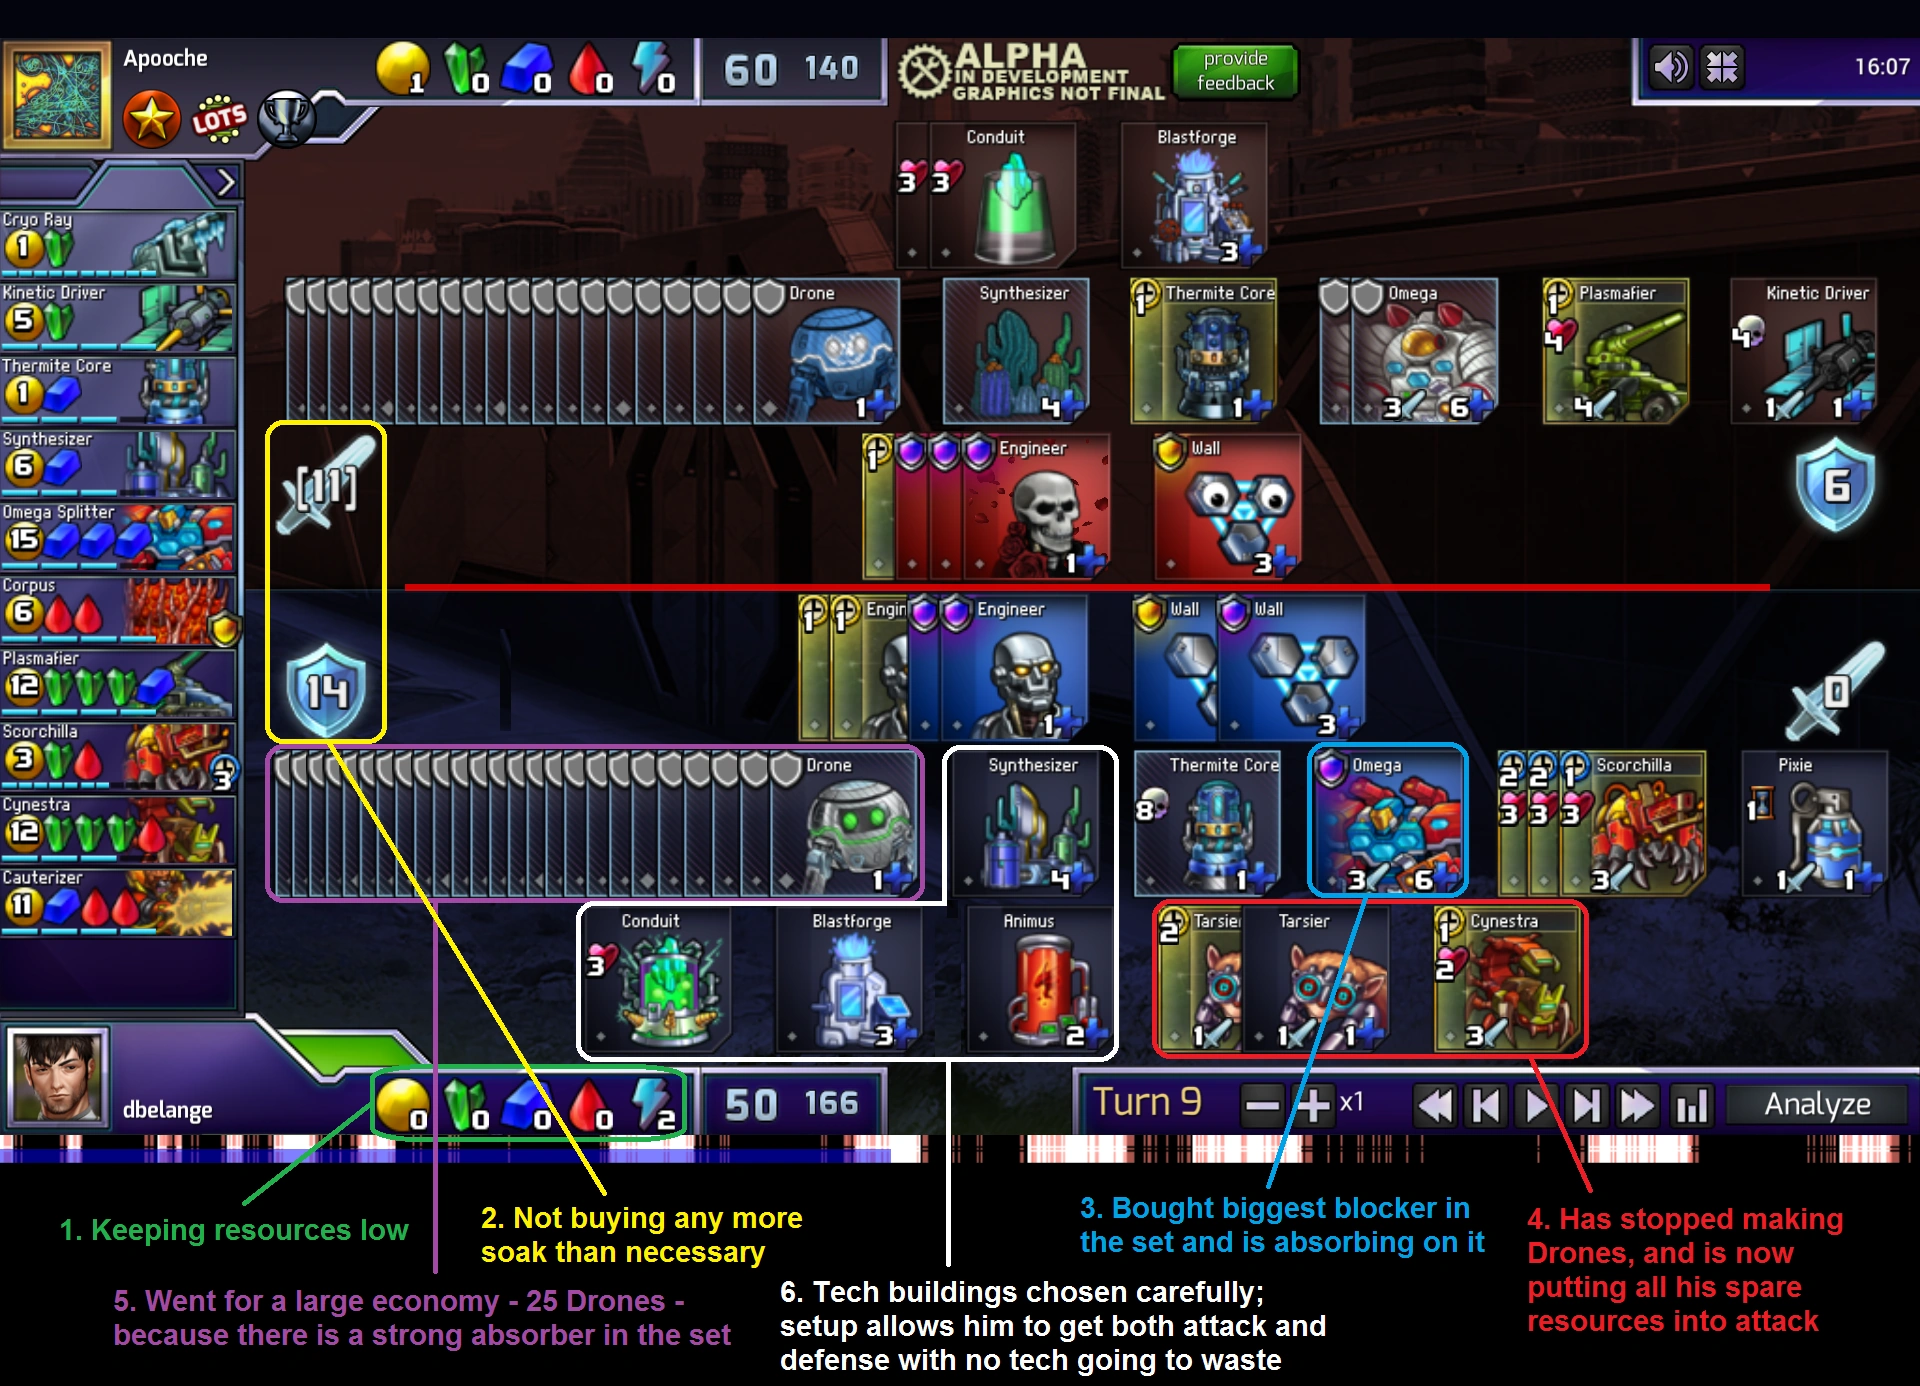
Conclusion[ | ]
To summarize, a standard game of Prismata looks like this:
First, you build up your economy. The biggest absorber in the set decides how much income you aim for. Once you're approaching your ideal economy size, you start adding on tech buildings and making attack.
Defense is made in response to your opponent - if they go for attack quickly, you go for defense quickly. If they go for attack late, you go for defense late. Make it a priority to get the biggest absorber out as soon as it will be absorbing for maximum.
Once both you and your opponent are over the absorb barrier, focus on defending by the bare minimum necessary and putting all of your leftover resources into attackers. As the game progresses and both players ramp up the damage they're doing each turn, defending will get more difficult. Eventually one player won't be able to defend anymore and will get breached, which usually means that they resign.
There's a ton of variety in Prismata, which is part of what makes it such a great game. As you can see from this guide, even standard games will vary widely depending on the random set, and there is plenty of room for both players to go for diverging strategies while still both playing the game in the standard style. There will also be plenty of nonstandard games where players don't follow all of the principles outlined here. Hopefully, this guide gave you a good foundation to start playing and understanding the game better.