(Removed outdated Blood Pact information.) Tag: Visual edit |
(Improved explanation of how buildtime makes it scale poorly with the late-game) |
||
| Line 11: | Line 11: | ||
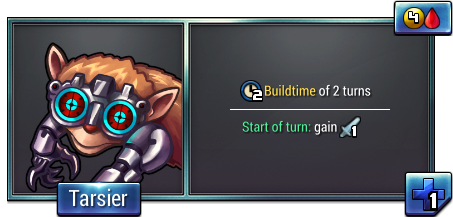
In [[random set]]s containing no better attackers they should be your best source of {{ticon|attack}}damage. Be careful not to overvalue them though, their {{ticon|build|2}} [[build time]] is a really severe drawback. If you go for {{PAGENAME}}s as your main attackers your opponent will have ample time to react: they can simply put down a [[Blastforge]] after your first 2 {{PAGENAME}}s are on the way and still have their first [[Wall]] ready to [[absorb]] the damage. |
In [[random set]]s containing no better attackers they should be your best source of {{ticon|attack}}damage. Be careful not to overvalue them though, their {{ticon|build|2}} [[build time]] is a really severe drawback. If you go for {{PAGENAME}}s as your main attackers your opponent will have ample time to react: they can simply put down a [[Blastforge]] after your first 2 {{PAGENAME}}s are on the way and still have their first [[Wall]] ready to [[absorb]] the damage. |
||
| + | Since Tarsiers have {{ticon|build|2}} [[build time]], they are worse later in the game. They are good attackers to start with but in the mid-to-late game Rhinos may be a better use of your {{ticon|red}} since they attack immediately while Tarsiers take two turns to even do anything at all. |
||
| − | If you're building an [[Animus]] in the mid-to-late game to get {{PAGENAME}}s as secondary attackers, you should probably not focus your [[resource]]s into buying all 10 of them as you are likely to run out of {{ticon|prompt}}[[Prompt]] defenders and get [[breach]]ed before they become cost-effective. Trying to set up a [[rhino|Rhino train]] or other [[preventive defense]] would probably be a more helpful way to spend your {{ticon|red}} after the first couple {{PAGENAME}}s. |
||
{{PAGENAME}}s must be protected from breaches at any cost, as their {{ticon|health|1}} [[Health]] will let your opponent wipe them out very easily. That makes them a risky proposition against opponents with access to {{ticon|chill}}[[Chill]] or {{ticon|attack}}damage burst. |
{{PAGENAME}}s must be protected from breaches at any cost, as their {{ticon|health|1}} [[Health]] will let your opponent wipe them out very easily. That makes them a risky proposition against opponents with access to {{ticon|chill}}[[Chill]] or {{ticon|attack}}damage burst. |
||
Revision as of 20:12, 26 June 2017


A Tarsier
Tarsier is an ![]() offensive Red unit, with
offensive Red unit, with ![]() 2 build time. It's part of the base set.
2 build time. It's part of the base set.
Panel
Strategy
Tarsier is ![]() red's basic attacker. It is the most efficient constant
red's basic attacker. It is the most efficient constant ![]() damage source from the base set, but takes
damage source from the base set, but takes ![]() 2 turns to build. Tarsier is considered the standard to measure the effectiveness of other units in gold-to-attack ratio.
2 turns to build. Tarsier is considered the standard to measure the effectiveness of other units in gold-to-attack ratio.
In random sets containing no better attackers they should be your best source of ![]() damage. Be careful not to overvalue them though, their
damage. Be careful not to overvalue them though, their ![]() 2 build time is a really severe drawback. If you go for Tarsiers as your main attackers your opponent will have ample time to react: they can simply put down a Blastforge after your first 2 Tarsiers are on the way and still have their first Wall ready to absorb the damage.
2 build time is a really severe drawback. If you go for Tarsiers as your main attackers your opponent will have ample time to react: they can simply put down a Blastforge after your first 2 Tarsiers are on the way and still have their first Wall ready to absorb the damage.
Since Tarsiers have ![]() 2 build time, they are worse later in the game. They are good attackers to start with but in the mid-to-late game Rhinos may be a better use of your
2 build time, they are worse later in the game. They are good attackers to start with but in the mid-to-late game Rhinos may be a better use of your ![]() since they attack immediately while Tarsiers take two turns to even do anything at all.
since they attack immediately while Tarsiers take two turns to even do anything at all.
Tarsiers must be protected from breaches at any cost, as their ![]() 1 Health will let your opponent wipe them out very easily. That makes them a risky proposition against opponents with access to
1 Health will let your opponent wipe them out very easily. That makes them a risky proposition against opponents with access to ![]() Chill or
Chill or ![]() damage burst.
damage burst.
Tarsiers naturally combo as a force multiplier with the Amporilla.
| Unit types |
|---|
|
|